Tuesday 31 May 2011

Quilting Adventures in Knitterland
sampler quilt finished

finished size 50 inches x 50 inches
DD and I spent some time on Friday and Saturday quilting GS#1's play quilt "in the ditch" (or somewhere near it). This is the same quilt that was formerly called "floor quilt" or "Project 2"; the progress of which can be seen here, here, here, here, here and here. The observant among you will notice the gap of nine months between the first and second post - it takes that long from conception to birth for a baby; why not a quilt? LOL

DD did a better job than I did at staying in the ditch; she is more of a perfectionist than I am and wanted to pull out her less-than-perfect stitches. I reminded her that we were making a quilt that would be dragged around the house, used to build cubby houses and to play peekaboo - we are not making an exhibition piece.

As an experienced knitter, I demand a high standard of myself and will rip out if I'm not satisfied with my own work; but as a novice quilter I think, "Let's just do our best and if it's less than perfect we had fun and learnt something along the way". At no point in the future do I think my grandchildren are going to say: "There are a few stitches out of place here, Grandmum"!

I spent Sunday afternoon cutting the binding strips and sewing them on. Somehow I missed attaching the first strip to the front of the quilt for about four inches - very strange! I also had some issues with puckering on the quilt back when attaching the first strip - so I ended up sewing that strip four times!

I spent Sunday evening in front of the television hand sewing the binding to the back of the quilt. Four hours later I was done.

So, fourteen months after the pieces were cut, GS#1 can build his first cubby house (although he's probably a bit young for that)!


Monday 30 May 2011

mobius wrap

Last July, DD and I attended a one-day workshop hosted by the Blue Mountains group of the Knitters' Guild of NSW. The tutor was Jude Skeers.

Before lunch we made sample mobius wraps in order to learn all the skills necessary to complete a full sized wrap; after lunch we worked on the "real thing".

I finished my wrap about two weeks later, but only got around to photographing this weekend before sending it off with the other 509 items to Australian Inland Mission.

I used the only yarn I had in my stash that fitted the description of the yarns we were asked to bring. I don't like mohair and was pleased to finish the wrap. I also don't think that orange and purple is a great colour combination - but other people have loved it!

I chose to knit the curved back (the alternative was a point) which turned out quite well.


The stripes work better on the front and the mobius twist adds that little bit of glamour to what otherwise would be a knitted tube.
Under the tee-shirt is an unscheduled appearance of GB#2, due 8th July!

Sunday 29 May 2011

Australian Inland Mission

The Australian Inland Mission was formed by John Flynn, the same person who started what is now known as the Royal Flying Doctor Service.

Australian Inland Mission is now known as the Presbyterian Inland Mission.

I was the contact point for warm clothing and accessories donated to this organisation through the members and friends of Knit4Charities during the month of April. The items will be distributed to Aboriginal communities, mostly in remote regions of the Northern Territory.

This year we received 510 wonderful donations. Thanks to everybody who contributed.

These pictures are a desperate attempt by DD and I to photograph all the items.

255 beanies/hats:


54 scarves

19 pairs mitts and gloves (there are also five scarves in this picture)

9 blankets and 2 baby wraps

10 teddies, 2 sunhats, 2 pairs slippers, five pouches and two pairs jeans (new)

9 neckwarmers and headbands, 27 pairs of socks/booties/slippers


10 ponchos/vests

99 jumpers/cardigans/vests (sweaters)


Saturday 28 May 2011

birdlife at Patonga

This is the house we stayed in (taken at low tide; at high tide the rocks in the right foreground were in the water)


... the advertising didn't mention all those stairs to the right of the photo up to the wooden balustrade then the walk across the front of the house to the even steeper flight of stairs up the left side of the house!


On the Monday after DD, SIL and GS#1 left, WM spent some time taking photos, including this bush turkey (WM was on the upper deck, the turkey on the balustrade below)
 
WM went downstairs to take this shot:


And who could resist these kookaburras?


Kookaburras are sometimes called "laughing jackasses" because of their unusual call. If you've never heard one, you can see a short video here.


As you can see from this sharp hooked beak, kookaburras are carnivores.


It's interesting to watch them bashing cold sausages just as if they were killing a live lizard or snake!

Friday 27 May 2011

these boots shoes are made for walkin'


How he managed to walk with one on backwards, we'll never know!

Thursday 26 May 2011

ennui - over and out
Part 1b

In my post on Monday, I said my first secret to breaking the boredom with unfinished projects is to finish them?

Well here are some more FOs:

This Tomten was knitted in my hand-dyed 8ply (DK) acrylic. I used three different but coordinating colourways, thinking they would work together well; this is certainly not my greatest design idea! Next time I would use the yarns alternatively, two rows of each colour, not one ball after another.
Tomten by Elizabeth Zimmermann (from Knitting Without Tears)

The first of these baby sweaters was knitted in 4ply (fingering) Panda Baby Magnum, in a variegated colourway which is not really as orange as it appears here. The second is knitted in three different balls of my hand-dyed 8ply (DK) acrylic yarn. I have learnt my lesson from the Tomten above; I used one colourway for the yoke and alternated the other two balls (two rows of each) for the body. I really like how this worked out and would definitely do it again! Mistakes are good if we learn from them!!
February Baby Sweaters by Elizabeth Zimmermann (from Knitters' Almanac)
Why did it take me so long to finish these three little things? In one word: procrastination. The zipper took a couple of hours to pin and sew (by hand) one side, then do the other side. The buttons - no reason really except that I have no idea how to place buttons correctly and so kept putting it off!

Isn't it amazing what one can achieve when one decides to "just do it"?

Wednesday 25 May 2011

Applique Adventures in Knitterland
eight more blocks started

ETA: This post was scheduled to be published at 8:09 this morning (I wrote it at 1:15am) - I don't know why it wasn't published!
~~~~~~~~~~~~~~~~~~~~~~~~~~~~~~~~~~~~~


It's amazing how much work goes into the simplest of products, like making these eight (incomplete)blocks.


I know many who read here are quilters but please, bear with me as I walk you through my process.
  1. Go to a store with thousands of bolts of fabric and choose ONE! Make sure it's one of the most expensive lines of fabric they carry! LOL
  2. Take the fabric home and admire your choice for a few hours (or days).
  3. Go to the laundry and press the fabric, being sure not to distort it!
  4. Return to the studio at the other end of the house. Fold the fabric in half; make sure the grain is straight!
  5. Cut three twelve and half inch strips from the 44 inch wide fabric. Don't forget: measure twice, cut once.
  6. Cut three twelve and half inch squares from the first strip and repeat for the second. Cut only two squares from the third strip.
  7. Choose eight checked fabrics for the houses and eight coordinating fabrics for the roofs. Keep in mind the fabric combinations already used on the first seven blocks (one shown here, the other six here) and don't repeat them.
  8. Iron the fusible webbing onto the wrong side of the house and roof fabrics (don't ask me why I needed to emphasise that!).
  9. Return to the studio and cut the houses and roofs from the fabric using a rotary cutter.
  10. Fold the remaining fabric and put it in a neat pile on the side of the cutting table, throw the usable scraps (bigger than 1 1/2 inches) in the scrap basket two metres (6 1/2 feet) away and the unusable scraps in the scrap bucket.
  11. Return to the laundry, taking the blocks, the pieces of "houses" and "roofs" and a twelve inch quilting ruler with you.
  12. Press a block, let the fabric cool, place the ruler three and a quarter inches from the bottom of the block, peel off the paper backing of one of the house fabrics, place the fabric one and three-quarter inches from the left edge of the block along the top edge of the ruler.
  13. Check all measurements at least twice.
  14. Remove the ruler without disturbing the fabric, press the house onto the block.
  15. Remove the paper backing from the coordinating roof, position it carefully so that the fabric just overlaps the fabric at the top of the house. Press into place.
  16. Repeat steps 12-15 for the other seven blocks.
And that's how to fill in a couple of hours and get some exercise while enjoying one's crafting time!

Tuesday 24 May 2011

ennui - over and out
Part 2

My second secret for boredom with projects on the needles is ...

Cast on something new!

Here we are, more than two thirds of the way through May and I realised I hadn't even looked at the Mystery 220 (Ravelry link) project for this month.


So, I found some appropriate 4ply (fingering) yarn

Moda Vera Noir sock yarn; colourway: Fantasia

and cast on!


after 60 rows

close up detail

Monday 23 May 2011

ennui - over and out
Part 1

I've found a way to get over my boredom with my current projects...

Finish them!

There is nothing deep and meaningful about this - simply a decision to "just do it"!

On Saturday night I put some of my favourite music on my iPod, put the iPod in the docking station and bit the bullet by sewing in the last 100 or so ends of my Fibonacci Strip blanket.


While doing so, I noticed that one of the patches had a dropped stitch. On closer inspection the stitch had somehow been broken or cut (it's acrylic so I doubt it was insect damage). I unravelled a row, picking up stitches top and bottom as I went, then tightened some stitches so that I had an end long enough to weave in, and sewed that end in.

With the long end that I had unravelled, I grafted the two rows back together again. Thankfully, it was a variegated yarn (one of my hand-dyes) so my wonky garter stitch grafting doesn't show up too badly!

Here, for your viewing pleasure, is the entire Fibonacci strip blanket.


The blanket was knitted in strips 20 stitches wide, with the length of each patch determined by the Fibonacci series of numbers: 1, 2, 3, 5, 8. For this blanket, 1 was equivalent to four rows.

When the strip was the correct length, I picked up stitches (with the purple yarn) along the side of the strip and cast on an extra twenty stitches (in a different colour) to begin the second strip. As I knitted each right side row, I knitted the last of the twenty stitches together with one of the picked up stitches along the edge of the previous strip (a technique from entrelac) - no sewing for this knitter!

After all eight strips were completed, I picked up stitches along both long sides and knitted borders, then picked up stitches from the top and bottom and knitted borders. If I hadn't told you, you might think I knitted the border in the round but I didn't, it only looks like it!

The only downside to my favourite theme in knitting - colour, colour, and more colour - is all the ends to be sewn in! Yes, I could weave them in as I go but ... well, you know how it is! Sometimes sewing ends in can be therapeutic!

Come back tomorrow for my other "boredom breaking" secret!

Sunday 22 May 2011

hat trick

Cricket was a game that my dad loved and played well into middle age.

In cricket, a hat trick is awarded to the bowler when three batsmen are bowled or caught out from that bowler's three consecutive deliveries. Not easy to do, as you can imagine.

The term "hat trick", according to Wikipedia - the source of not always accurate information - was first used in cricket in 1878, and is now used in other sports, as diverse as soccer, lacrosse, hockey, motor racing, darts and poker!

If I had been raised in a "betting" family, I may have called my post Trifecta, so I guess by now you know that three is the essential number here! LOL

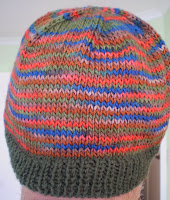
I completed three hats (we call them beanies) in three consecutive days so may I present my hat trick?

All three are variations of my "go to" pattern, which is labelled Beanie With Pompoms in Handknits to Wrap and Adorn (Ravelry link). Mine definitely do not have pompoms (nor are ever likely to!)

The first is Self Striping Beanie, which is knitted from 8ply (DK) acrylic which I hand-dyed using acid dyes. Here is the yarn in the round, so to speak,


and here is the beanie:


I love the process and products of hand dyeing but am a bit over the self striping or blotchy "pooling" effects of these yarns. This second hat, my Not So Subtle Stripes beanie, uses the left overs of the above yarn paired with a solid acrylic of unknown origin. I like the way this breaks up the pooling.


You know, it's astonishing how plastic-y acrylic feels when I have been knitting in wool for several weeks! I guess that's because it is a form of plastic!

The third beanie is my favourite of the three. It was actually the first of these three beanies to be finished but I'm one of those people who likes to leave the best till last.

I call it my Subtle Stripes beanie. It is knitted in the remainder of the variegated yarn used for my Water, Forest and Fire scarf (Ravelry link to my project page) with a ball of Moda Vera Pure wool, colour Fern.


I love the way the stripes work in this beanie and will definitely repeat this idea.

Now I understand why so many beanies turn up in the charity parcels - they are so quick and easy to knit! There's no need to repeat one to create a second one (as is the case for socks/mittens/gloves), and no boring repetitiveness (as in scarves) because they are done so quickly. In many cases, a 50g skein is enough to complete a hat so three or four hats can be made from the same amount of yarn taht is used to make one scarf.

Long live the hat - may many heads be warmed!

Saturday 21 May 2011

Applique Adventures in Knitterland
a visit to Hobby Sew

Firstly, thank you for your comments regarding my dilemma with not having enough fabric to make the blocks for my Houses quilt.

I went to Hobby Sew in Kings Park on Thursday after work. Hobby Sew has an extensive range of fabrics and, more importantly, they have staff that know what they are talking about and give excellent customer service. Imagine, a large store that actually greets you on entry!

Before going to Hobby Sew, I had considered all my options regarding my Houses quilt and decided to purchase more fabric in a lighter colour. At first I looked at lemons - but I didn't like the green and gold theme (don't get me wrong, I love Australia; I just didn't want that combination for this quilt). I tried creams - better, but still not quite right.

Then I found a beautiful, subtly patterned, green fabric. It was expensive.

I tried to ignore it. I looked at other fabrics. But in the end, it was just. so. right. and I had to buy it.

I have tried to photograph it but cannot convey the way the pattern shifts from light to dark, how the dots randomly form little flowers and yet, from a distance, the fabric looks solid. This is the best I can do - photographed with the bottle green of the other blocks; don't they look good together?


And, for my applique, I bought these:


Friday 20 May 2011

I felt honoured

Last week I received a phone call from the member of the Knitters' Guild of NSW who is organising the biannual camp. She had heard that I was a good teacher and had recently done a couple of workshop on entrelac. She wanted to know if I would teach a session or two at the camp.

I was flattered. I wondered who had said something - but I think I have that figured out (three of the Guild's current executive are members of the same group to which I belong). Part of me wanted to say "yes" but part of me resisted.

You see, the camp is always held on the Long Weekend in October. WM has a rostered day off every fourth Friday and for the past couple of years, that Friday has been at the start of the October Long Weekend - as it is this year. Because he has four days off, we often go away.

So, we talked it over and guess what - I'm teaching two sessions of entrelac at the camp in October.

Is anyone else going to camp?

Thursday 19 May 2011

applique adventures in knitterland
patched laundry bag

A long time ago, our laundry bag (which is only used when we go away) was caught on something and got torn.

On Saturday I decided to patch it! I know it's not perfect but it's just a laundry bag and, most importantly, I had fun playing around with applique.

house width = two inches
Are we seing a theme here?

Wednesday 18 May 2011

I do still knit


DD started this scarf but got bored with it - I think the "drop the yarnovers" row got to her! I finished the scarf while we were away, I think while we were watching The Royal Wedding. It's made from yarn which DD hand-dyed; it started life as Bendigo Wollen Mills Rustic 8ply (DK).

The pattern is Christine Vogel's Drop Stitch scarf (Ravelry link); this is the second time I have knitted this quick but effective pattern.


I started this scarf last Monday for the hour commute to Strathfield to put mum on her CountryLink train. I just can't sit for an hour and do nothing. Again, it is the Drop Stitch Scarf pattern.


I cast off on Sunday night and sewed the ends in on Monday morning. The yarn is a collaborative hand-dying effort from DD and I (also Bendigo Wollen Mills Rustic 8ply - DK). We play; some combinations work well, other's not so well.

The colours of the full scarf on the left are much more accurate.


This hat is knitted with a band of plain green wool and the leftovers of the scarf above. I cast on this hat on Monday night but stopped ten rounds short of the end; I just couldn't keep my eyes open. I finished it on Tuesday evening and sewed the ends in right away. I even cast on for another hat!

The pattern is my "go to" plain beanie pattern: it comes from Cleckheaton book #956 Handknits to Wrap and Adorn (Ravelry link).


As for works in progress (or hibernation as the case may be), I have these:
  • the hat I cast on last night (three rounds of ribbing done so no photo to show you - it's the same green as the hat above)
  • the toe up socks for WM - I almost finished one and it fit beautifully; then I tried the tubular cast off from Wendy Johnson's book Socks from the Toe Up (Ravelry link) - and it was so tight that WM couldn't get it over his heel. He wouldn't have been able to wear it even if he could get it over his heel, it would have cut off his circulation! I don't know what I did wrong but it's been languishing in the naughty corner for a couple of weeks now!
  • the Fibonacci strip blanket - I still have a few dozen ends to sew in; although mum did so sew some of them when she was here a couple of weeks ago (thanks mum)
  • the Ambassador of Love mittens - I have SMS (second mitten syndrome)!
  • man's fingerless mitts - SMS again and no photos!
This cold weather is certainly conducive to knitting but my knitting muse seems to have left me - I think I need a complicated project to spur me on. I feel a certain amount of ennui with all the things I have on my needles; even with most of the things in my Ravelry queue! I really want to try knitting a shawl but are they practical items for charity knitting? Would a homeless woman really appreciate one? Would an Aboriginal woman living in a remote outback community? What do you think?